Use the following tools to assembly the cylinder:
MEL1396 – Seal Installation Tool
MEL1033 – Rod Seal Installation Tool
Piston Ring Compressor
Spanner Wrench
Wash the cylinder parts in solvent and air dry them.
Inspect the cylinder parts for nicks, scratches or other damage. Replace any damaged parts.
Always install new O-rings and seals during assembly.
Lubricate all O-rings and seals with hydraulic oil during installation.
Install the new seal on the tool and slowly stretch it until it fits the piston [Figure 20-21-13].
Allow the seal to stretch for 30 seconds before installing it on the piston.
Install the O-ring and seal on the piston (Item 1) [Figure 20-21-14].
Use a ring compressor to compress the seal to the correct size. Leave the piston in the compressor for about three minutes.
Install the rod seal on the rod seal tool [Figure 20-21-15].
NOTE: During installation the O-ring side of the seal must be toward the inside of the cylinder.
Rotate the handles to collapse the rod seal [Figure 20-21-16].
Install the rod seal in the head [Figure 20-21-17].
Install the wiper seal with the wiper toward the outside of the head.
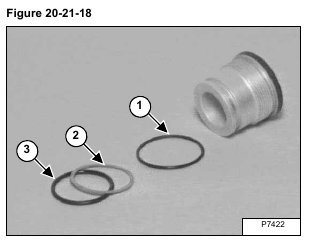
Install the thin O-ring (Item 1) [Figure 20-21-18].
Install the back-up washer (Item 2) and thick O-ring (Item 3) [Figure 20-21-18] into the groove on the head.
NOTE: Clean and dry the threads before installing the nut. Install the new nut from the seal kit.
Install the head (Item 1), and the piston (Item 2) [Figure 20-21-19]. The small diameter of the piston goes into the
cylinder tube first.
Grease the piston where the nut contacts the piston. Do not get grease on the threads. Install the new nut (Item 3)
[Figure 20-21-19].
Tighten nut (Item 3) [Figure 20-21-19] to 850 ft.-lbs. (1153 Nm) torque.
Put the base end of the hydraulic cylinder in a vise.
Tighten the head using a spanner wrench [Figure 20-21-20].


